
|
< 1 Quick Start Guide | Index | 3 Objects > 2 InterfaceThe interface for Battle Mines is divided into several screens, any of which can be accessed by clicking on the lower hud buttons. There is an upper hud with regular updates on your empire's status.On the news button in the rightmost lower hud are numbers showing new messages and events. If something changes unexpectedly (ie. buildings destroyed, objects disappearing) click this button to check your news events. 
2.1 City Screen(Hotkey: C)The city screen contains an isometric view of the buildings on your land, which is divided into tiles. Each building has a footprint that maps onto these tiles. The total area available to you for building is a square, from 5x5 tiles to 10x10, increased by gaining certain tech levels. When you mouse over the city, building images will be brought in front of others for easy viewing. Some buildings will pop up with timers and status indicators; these are production buildings. If clicked you will harvest, or try to begin producing a resource at the building. Any changes in inventory will appear briefly at the lower right of the screen. Clicked buildings that do not set or change a harvest will instead trigger a popup with information about that building. Crops and rubble are not buildings, but special tiles that unload their contents into your inventory when clicked. Crops grow if you have a positive GM. Rubble left behind when buildings are destroyed. At the bottom left of the city screen is a manifest of all buildings and special tiles in your city. By moving the mouse over the manifest, the city changes to show the selected type, making it easy to locate things. To the upper left of the city, below the upper hud, instruction buttons will appear including the hotkey to activate various activities like building and scrapping. 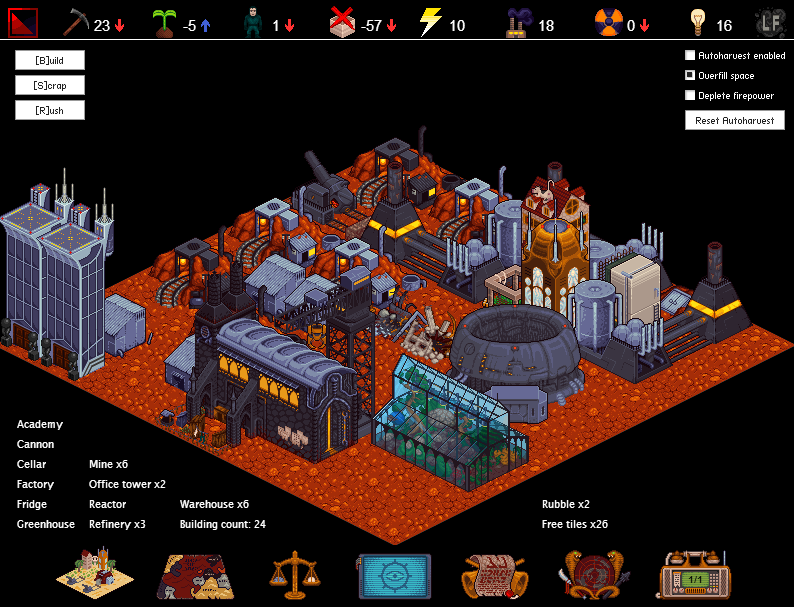
How to build a building:
You may press escape during construction to go back a step. Note that while placing a building, or mousing over the "Free tiles" marker in the building manifest, the following colour coded tiles appear:
Colours higher up in the list take precedence. From the main city screen, you can also press S to scrap a building, and R to rush a building's production. Click the target building to confirm the action. Press escape to abort either of these. 
2.2 Map Screen(Hotkey: M)The map screen shows the world around your city, which appears at the centre of the map. Lands surrounding yours will contain other players, your friends perhaps, who may help or hinder you. The Sea of Rust is a dark, brooding brownish colour. To explore the darkened lands, click the visible area and build an outpost. Once an outpost is built, you can click the exposed player's city to view their player profile. Your own player profile is accessible by clicking your land at the middle of the map, or empty space in the upper hud. To the top left of the map area are overlays which can be selected to provide additional information on the map. When using the topography map, the weather appears at the top right; mousing over it shows the forecast. Be on the lookout for wet weather, as it will cause your inventory to overflow. 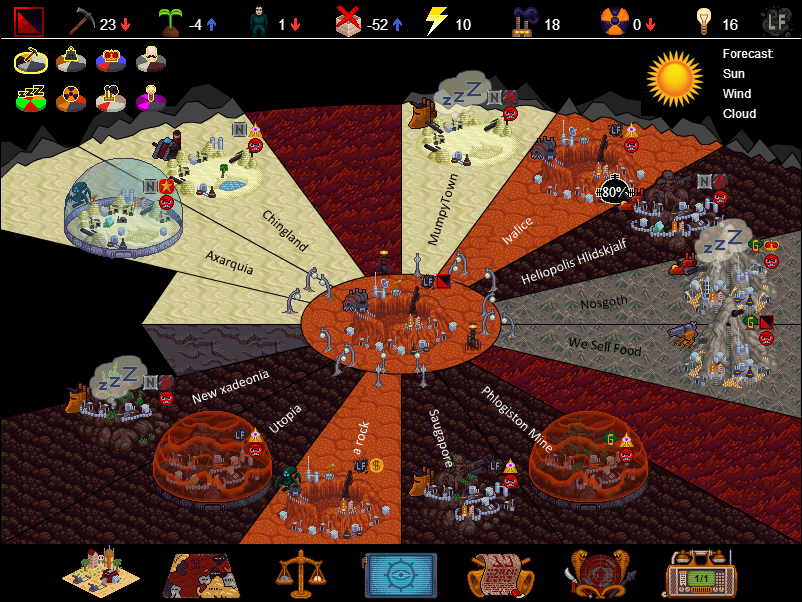

2.3 Trade Screen(Hotkey: T)The trade screen is important, this is where you trade with other players to get the objects you need. The right side of the trade screen contains all the trades available to you. Scroll down to see them all. At the top left is your inventory. You can click objects in the inventory to filter by trades offering that object, shift-click to filter by requests. Remember, trades are always listed in the order offer first, then request.
Below the inventory is the interface for creating trades. Choose an offered object and quantity, a requested object and quantity, and decide whether you want to make the trade repeat or not. The maximum number of different trades you can offer is listed, click your existing trades to remove them. If the roster is full when you create a new trade, an old one will be bumped off the end. Try using the trade generator, to speed up the process and get an idea of basic ratios. Through combat you may gain vassals, or a master if you are unlucky. Where normal trades are white, vassal trades appear in blue and cannot be cancelled or changed. They are always for base materials, and always repeat. Global trades become available after you build a customs house or office tower. They appear in green, and are posted by anonymous players who are not your neighbour. Invalid trades are never seen globally, although sometimes they will be expired or invalidated before they can be taken, in which case they are removed immediately. Trades of the hour and day are posted by the IWI, and are always available. At the top right of the trade screen is a button which leads you down the shady path to the black market. Ramul provides instant gratification to those who can handle his exorbitant prices. To hear Ramul's offer, select a type and amount of object to request, similar to a normal trade. You can check multiple objects in the list to create your offer, Ramul will select from among them based on the Ramulgorithm settings you pick. See the Black Market section for more details. 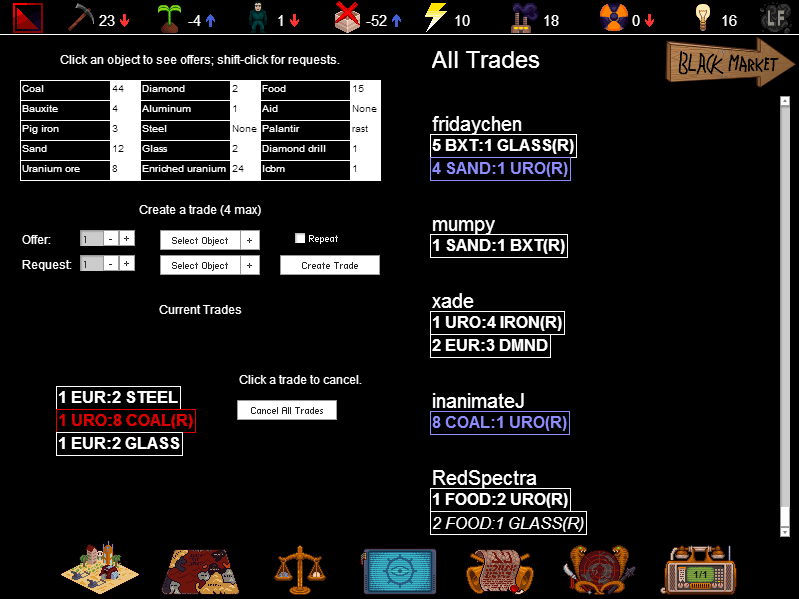

2.4 Tech Screen(Hotkey: E)The tech screen is where you go to advance your empire's abilities. Tech trees grow from the bottom of the screen upwards; to unlock higher technology you must first acquire their prerequisites. Players start on the lower tech tree, and can later advance to the upper tech tree. Upper and lower trees can be toggled using the button at the top left of the screen. Each box in the tree contains a different technology. Information from top to bottom includes the title, category, prerequisites, cost (initially hidden) and description of the tech. When a technology becomes available for research, the cost is revealed, as well as a "Research" button at the top right of the tech box. After a tech is researched, this button is replaced with a tech level number. The order in which technologies are acquired is important because, should they be lost (due to theocracy, diabolical machines, or other affects) it will be in the same order they were researched, reversed. If a player chooses the theocracy government, the abilities bestowed by some researched technology are restricted. Such technologies appear with an orange border to show they have been compromised. Other governments can come to this screen to unlock bonus abilities beyond their current tech level. These bonus techs will appear with a cyan border. Note that this special give-and-take of abilities does not affect which techs have actually been researched and paid for; technologies available for research remain the same, and a change in government will revert the tree to its usual form. There are a few special things to note about the tech screen. All tech costs listed are hard requirements, base materials cannot be paid for with refined materials nor vice-versa. Once a player completes the lower tech tree (or "n00b tree") by reaching the terraforming tech, they will never again fall below that level by any means. See the Technology section for more information. 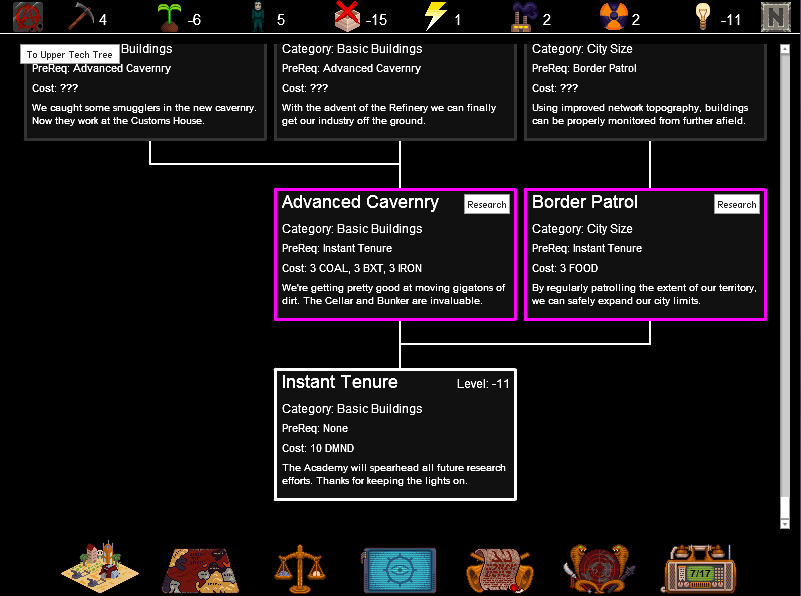

2.5 Policy Screen(Hotkey: P)On the policy screen, you can choose government and industry, which can effect your play style and give you various bonuses. Your advisors will be chatting away with each other, you may request that they suggest courses of action you could take. Hitting the View Governments or View Industries button will display what is available, click the small icons to investigate and change these policy settings. There is a statistics tab where you can see how most of the numbers in the upper hud are arrived at, and how pollution and fallout are expected to change (barring unforeseen events). Mouse over the elements for details. 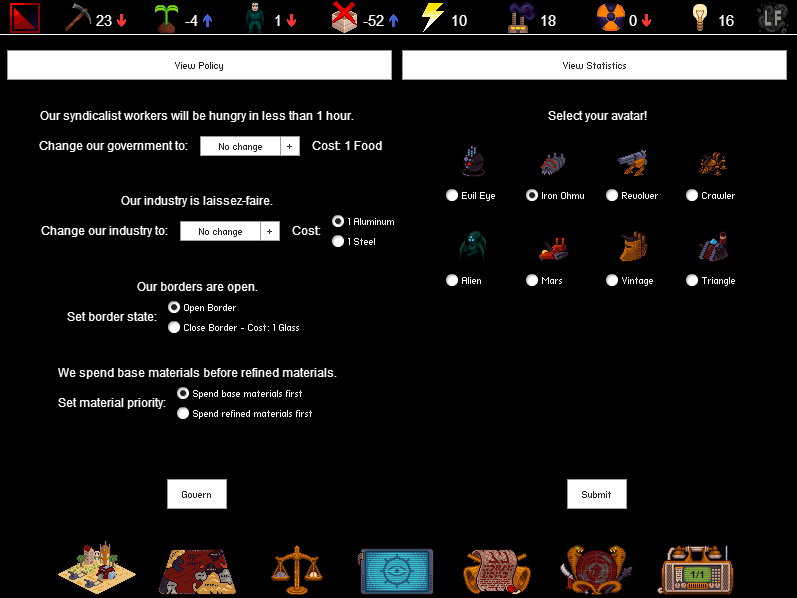

2.6 Politics Screen(Hotkey: O)Another dual-tabbed screen, politics are useful for assessing global events in the world of Battle Mines. Through the senate, rules impacting global governance can be voted on, while the scoreboard lists how local players and global leaders measure up. The player profiles of global leaders and visible neighbours can be accessed by clicking their name. 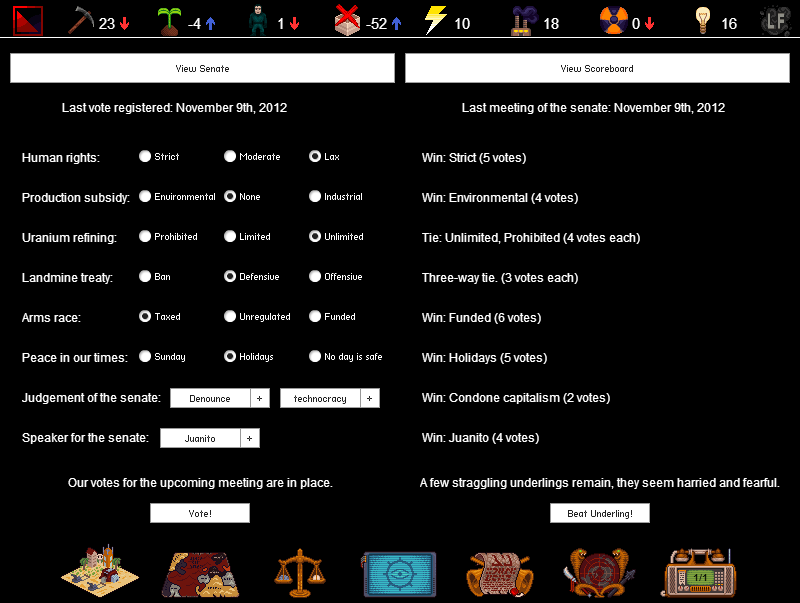

2.7 News Screen(Hotkey: N)The news screen, importantly, puts you in touch with other battle miners and keeps record of all happenings in your empire not directly caused by you. This includes random events, attacks, nearby combat and world events. At the top of the screen are two large buttons, to toggle between messages and events. On the messages page you can talk to other players, privately or as a group. The events page is only for browsing, it also shows the weather forecast. Both screens list items in reverse chronological order. Any message or event involving a player can be clicked to summon their player profile. On the news tab, some events are compressed to save space. For example, you may get a new corruption report covering several hours worth of stolen objects, but because these are gains over a long period of time, current inventory may have been impacted by other events and fluctuations. A maximum of one hundred entries will be maintained for each list. 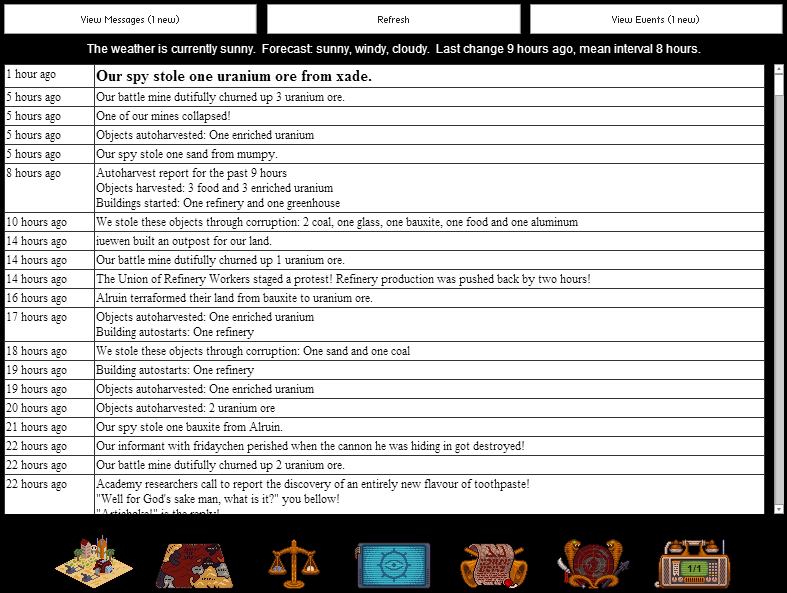
2.8 Player ProfilePlayer profiles are activated by clicking any visible player on the map, or names in the news and politics screens. They open as a popup, giving you known details about the player including espionage reports, and a sidebar of ways to interact with them.Note that your own player profile sidebar is important for performing some non-policy empire functions, like terraforming and feeding the people. To see your player profile, click your own battle mine at the centre of the map screen, or simply click an empty area in the upper hud. 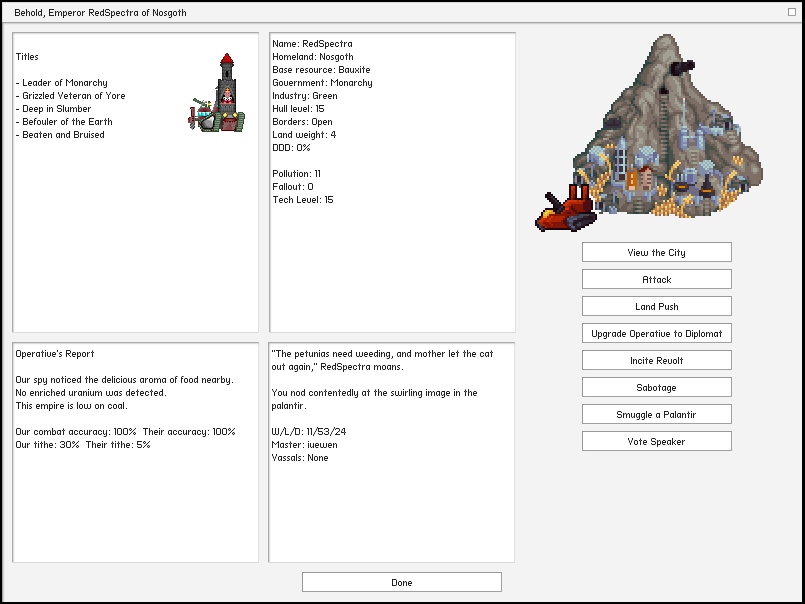
2.9 Heads Up DisplayThe upper hud displays several key elements contributing to the strength of your empire. From left to rightmost:
For more details on where hud numbers come from, consult the statistics tab of the policy page. Clicking the upper hud (between icons) brings up your player profile. The lower hud allows you to move between game screens, hotkeys are also listed. Keep an eye on the lower right news icon, it shows how many messages and events are lined up in the communications lab. 2.10 Inventory(Hotkey: I)Your inventory is a convenient summary of objects held at any given time. The first column shows base materials, in object value order. The second column shows the refined materials that those bases can be made into. Finally come items, in object value order again. 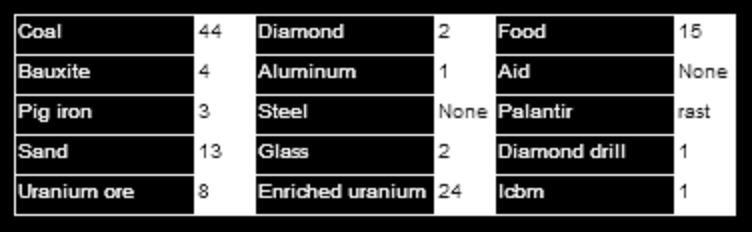
If you possess any bonus objects, these will be shown in teal to the right of the normal object quantity. To save room, bonus objects will cause objects in large quantities to be abbreviated: Normal objects (>100) as "99+", bonus objects (>10) as "9+". The inventory is often part of the interface, it can also be viewed by pressing the I key at any time. Any changes that happen to your inventory while you are playing will be summarized by a slide-in at the lower right corner of the screen: Green for gain, red for loss, cyan for bonus objects. Note that if several things happen which affect your inventory at the same time, the summary will show net changes for all of them. For example:
If these events happened simultaneously, the summary would show: -3 SAND, -1 IRON 2.11 Cluster ButtonsThe cluster buttons appear at the bottom right of all proper screens. They present the following functionality:
The plot points are a series of missions that can be achieved through game play. Each full chapter completed contains a reward, the second chapter is necessary to access syndicalism government on the policy page. < 1 Quick Start Guide | Index | 3 Objects > |


